
Free Software Download Center
Software for industrial data collection, monitoring, and analysis.
DATA SELECTION • MAIN ARCHIVE • ADDITIONAL ARCHIVE • QUICK DATA VIEWING
The user must determine which of the SCADA data collected by EOS SCADA Runtime will be archived in the main and additional databases. This selection is performed through the Data Selection Panel.
Through the same panel, data to be used in the main database, in each additional database, and for Quick Data Viewing can be selected separately.

To determine which SCADA data will be stored in the main and additional archives, click the DATA SELECTION LIST button under the SHOW menu item. This opens the Data Selection Panel.
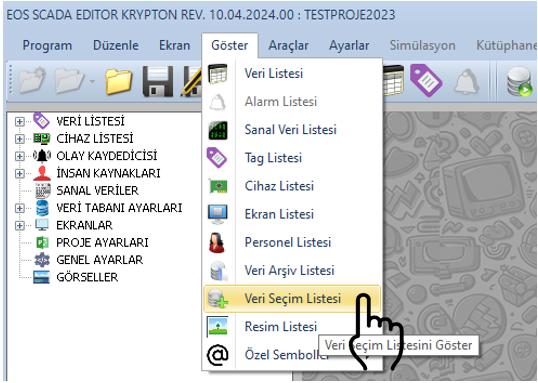
Information: The Data Selection Panel is used to determine in which databases the data available in the SCADA system will be archived and which data will be used for quick viewing.
The Data Selection Panel lists all data available in the SCADA system. The columns in the list provide selection fields for different purposes.
Main selection fields in the panel:
Data to be archived in the main database is selected using the Main Database column in the Data Selection Panel.
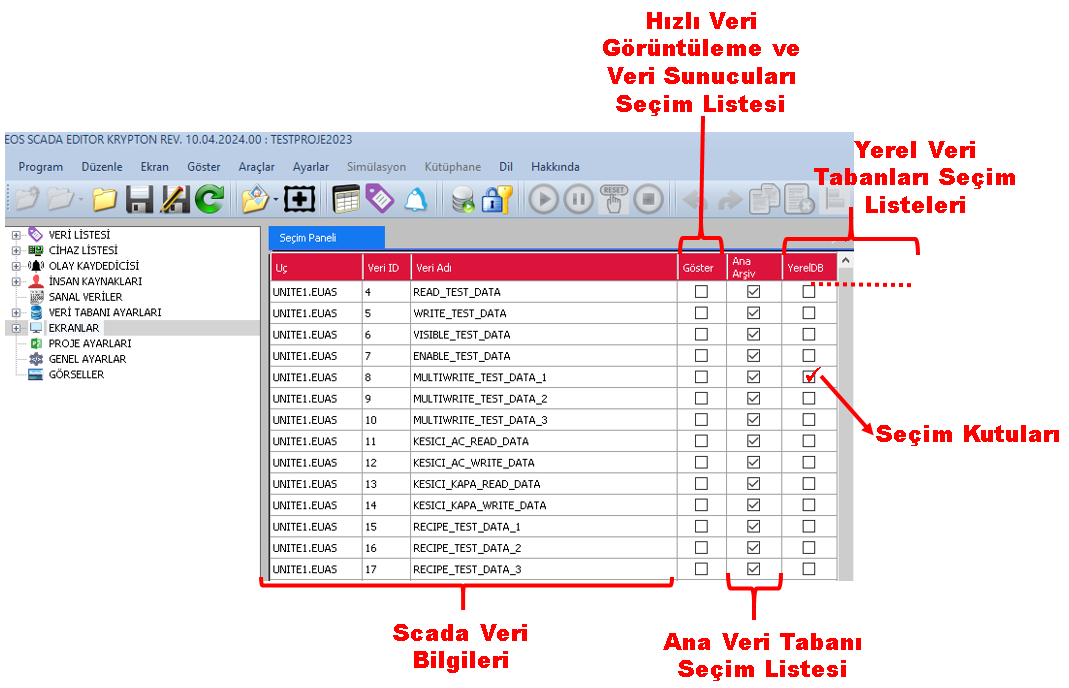
The project is therefore configured so that only the selected SCADA data will be archived in the main database.
The user can independently select the data to be archived for each Additional Database. The checkboxes in the column corresponding to the relevant additional database are used for this purpose.
Important: Data selections can be made independently for each additional database. This makes it possible to archive different data sets in different databases.
When the EOS SCADA Runtime window is minimized, data selected for quick viewing can be displayed as a list in a balloon window associated with the notification icon.
The data to be displayed quickly can be selected from the Quick Data Display column in the Data Selection Panel.
Purpose: When the main Runtime window is not open or is minimized, the balloon window in the notification area can be used to quickly access selected process data.
To use the Quick Data Display feature, the UseQuickDataDisplay property in the PROJECT SETTINGS table must be set to true.
CAUTION: Even if data has been selected for Quick Data Display in the Data Selection Panel, the feature may not be available if the UseQuickDataDisplay property is not set to true.
| Property | Value | Description |
|---|---|---|
| UseQuickDataDisplay | true | Enables the Quick Data Display feature. |
The Data Selection Panel is one of the fundamental configuration screens used to determine in which archives SCADA data collected by EOS SCADA Runtime will be stored.
Through this panel, the user can independently select data for the Main Database, Additional Databases, and Quick Data Display. This allows archiving requirements and the need for rapid data access to be configured independently of each other.
To use the Quick Data Display feature, the UseQuickDataDisplay property in the PROJECT SETTINGS table must also be configured as true.
Free Software Download Center
Software for industrial data collection, monitoring, and analysis.

Technical Support
Software documentation, sample code, and practical technical information.
You can contact us regarding EOS software, technical documentation, or industrial data communication.