Project Selection
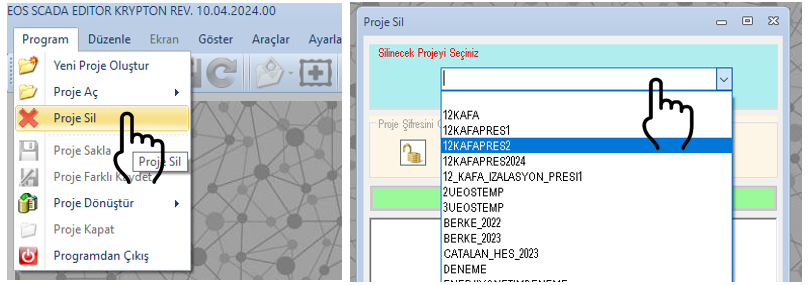
In the Delete Project panel, select the project to be removed from the hard disk.
PROJECT DELETION • PROJECT PASSWORD • TWO-LEVEL CONFIRMATION
To completely delete a project, the project must first be closed. After the project has been closed, the DELETE PROJECT command under the PROGRAM menu can be used to start the project deletion process.
In the Delete Project panel that opens, the project to be removed from the hard disk must be selected. If a PASSWORD has previously been defined for the project, this password must be entered in order to continue with the deletion process.
After the required selection and verification steps have been completed, clicking the DELETE PROJECT button starts the deletion process. The selected project information is completely removed from the hard disk after the two-level confirmation process.

When a project needs to be completely removed from EOS SCADA, the DELETE PROJECT command can be used. This operation removes the information of the selected project completely from the hard disk.
The project to be deleted must be closed before starting the project deletion process. An open project should not be deleted directly.
Important: Project deletion does not simply mean exiting the active working environment. After the confirmation steps have been completed, the information belonging to the selected project is removed from the hard disk.
After closing the project, click the DELETE PROJECT command under the PROGRAM menu.
When the command is selected, the Delete Project panel opens. The project to be deleted is then selected from this panel.
If a PASSWORD has previously been defined for the project, the corresponding project password must be entered at this stage.
In the Delete Project panel, select the project to be removed from the hard disk.
If a PASSWORD has previously been defined for the project, enter the password to continue with the deletion process.
After the project selection and required password entry have been completed, click the DELETE PROJECT button to start the deletion process.
The following sequence should be followed to start the project deletion process:
Clicking the DELETE PROJECT button does not immediately remove the project. The two-level confirmation process must be completed before the deletion operation can be finalized.
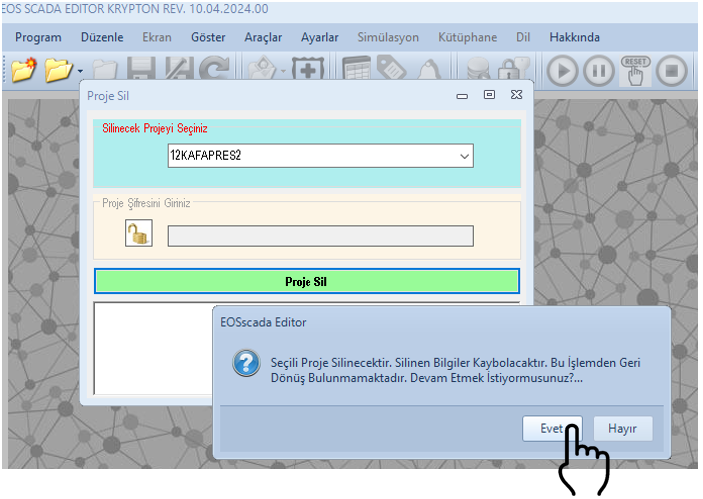
Once the confirmation process has been completed, the selected project information will be completely removed from the hard disk.
Process summary: Project selection → Password entry (if defined) → DELETE PROJECT → Two-level confirmation → Removal of project information from the hard disk.
⚠️ WARNING: Archiving the project information before deleting the project may be useful to prevent unwanted data loss.
The procedure for archiving project information is explained in the PROJECT EXPORT section.
Therefore, before deleting a project, consider archiving any project information that may be needed later.
To completely delete a project, the project must first be closed and the PROGRAM → DELETE PROJECT command must be used.
In the Delete Project panel, select the project to be deleted. If a PASSWORD has been defined for the project, enter the password and click the DELETE PROJECT button.
After the two-level confirmation process has been completed, the selected project information is completely removed from the hard disk.
Reminder: To prevent unwanted data loss, it may be useful to archive the project information before deleting the project. The archiving procedure is explained in the PROJECT EXPORT section.

Free Software Download Center
Software for industrial data collection, monitoring, and analysis.

Technical Support
Software documentation, sample code, and practical technical information.
You can contact us regarding EOS software, technical documentation, or industrial data communication.